experiments, part 2
I wrote a little while ago about my recent experiments with digital printing on organza. Many of you readers were very interested in reading about my process, so I thought I’d update you on the results of some further experiments. If you missed that post, do go read it first in order for this one to make sense.
1. I mentioned back then that I would try a fresh new can of repositionable adhesive to place the organza on a lighter paper backing. I did this but it still caught in the printer head! Because the paper has to feed around the roller of the inkjet printer, the stress loosens the fabric, so nix for that method!
2. Then I followed up on a suggestion by Michiko to glue the fabric down with water-based Japanese paste. I decided to use mylar (not the inkjet mylar) as the base because this is heavier and stays flat. The organza, being so light, slippery and easily distorted, was difficult to lay down straight but it stuck really well and fed through the printer without problems.
3. I prepared another piece of organza with InkAid, a paint-on coating like we find on coated papers for inkjet printers. This product gave the organza a bit more body and made it easier to handle and glue to the mylar, plus I hoped that it might hold more ink. This went through the printer very well.
4. After allowing the ink to dry overnight on the above two prints (#2 & #3), I took one at a time and placed it into a sink of water to wash out the glue and lift up the organza. The first one without the InkAid lost most of its colour, but the InkAided one held more of the ink and maintained a little more body to the fabric.
CONCLUSION: The process #3 works well. However, in all of the experiments, the amount of ink retained by the organza is very light and I don’t think they are strong enough images for my needs.
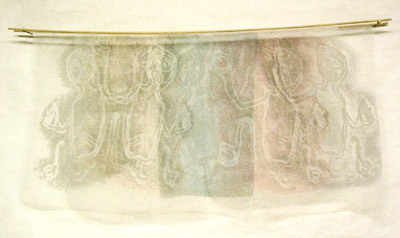
Just for fun, I took several of the test prints and sewed them onto two wood dowels. I hung them with the front dowel about an inch away from the back panel which is mounted slightly out from the wall. The space allows one to see through to the layer behind much better than if the fabrics was touching. The wood dowels are bent because they had been standing in the corner of our garage for many years, yet the effect is rather interesting. These were not intended to be actual finished works, but let’s call this grouping a STUDY.
As I said, I still find the prints too weak so I’ve decided to set aside the organza for awhile. Tomorrow I’m going to test out the semi transparent inkjet vellum that has just arrived. I’m still going to try find out about other fabric options, including the just-learned possibility of inkjet ready silk on a roll that a new printmaking faculty person at the art school (Emily Carr Institute) has in her possession!! Interesting possibilities ahead!
March 2, 2006 in Being an Artist, Digital printmaking by Marja-Leena