on macro photography

crown_of_thorns.jpg

As I’ve mentioned previously, this new year I’ve been learning how to do macro photography with our DSLR camera, first with a zoom-macro lens, then with extension tubes. So far I’ve been happiest with a single 36 mm extension tube joined with the regular lens (18-55mm). There are two more rings or tubes that I will be testing out some more in different combinations.

After a few practice sessions here are the most important lessons I’ve learned and am noting here for my own records and for any readers who may be interested:

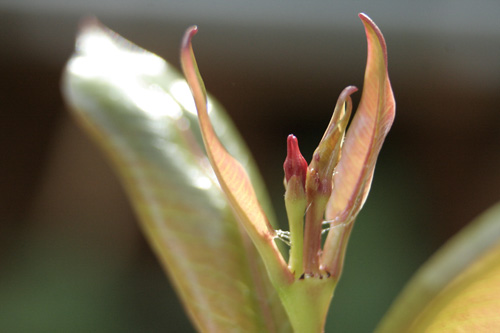
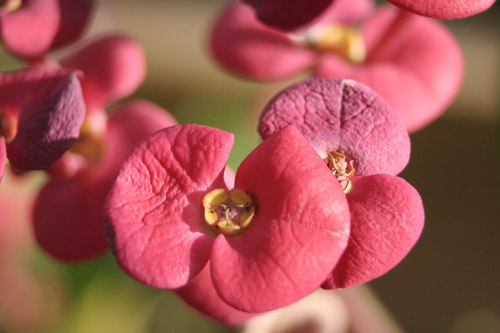
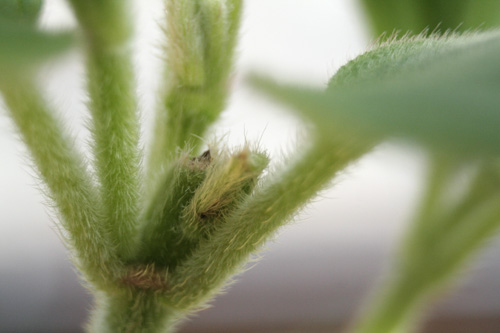
1. One needs very good light conditions. The length of the macro ‘tube’ reduces the amount of light reaching the sensor (‘film’). Dark rainy days are not conducive to this kind of photography. Yesterday’s sunshine let me do a lot of work in the solarium with easy and still subjects in my flowers and plants, and a few outdoors in the garden as well.

2. One must use a tripod. Any shake is amplified in macro resulting in very blurry shots!

3. Even better, use the timer setting on the camera. Even manually pressing the shutter while the camera is on the tripod can move the camera a little. We attempted a shutter cable from our ancient film SLR camera but there is no input on our DSLR. Great invention, the timer!

furry_leaves.jpg

4. Largest f-stop (smallest lens opening) is generally best. See #1.

5. Eyeglasses get in the way of focusing! Setting the diopter adjustment in the camera to my own vision in the right eye (similar to ones on binoculars) allowed me to focus more clearly, though it is annoying to keep taking glasses on and off (wear something with generous pockets!).

6. One need lots of time to set up the tripod and camera and focus! Practice will improve speed I’m sure.

7. All this heavy equipment – a big camera, different lenses and a tripod – means that I’m not likely to take these along on quick casual walks. The little point-and-shoot is pretty good for that. When I really must take the superior equipment, I will have to use one of those upright shopping carts on wheels, even if it makes me look like a bag lady 🙂

All this is old-hat to expert photographers so please don’t laugh at my amateurish struggles. I’m learning (thanks to husband’s patient help) and getting ever more excited by the results. Whoo-hoo!

No adjustments to these photos have been made in iPhoto or PhotoShop other than resizing and compressing for the web. I wish you could see them full-screen size! More photos to come….

dipladenia.jpg

on this day

UnknownBerries.jpg

JapMapleLeaves.jpg

orangeLeaves.jpg

This morning in the printmaking studio was somewhat frustrating for me. Lucy, our trusty and faithful wide-format printer was not happy. I’ve been trying to print a trial proof of a template image for my next series of prints. (I’ll tell you soon about the ones just finished.) I need to be sure the layout is right before I start placing the images on the page so I don’t have to redo them all. But Lucy now has a fancy new computer with the latest new OS and she’s making strange. Our fab technician and the IT person have been working on it the past few days but it still wasn’t working for me.

Somewhat dejected as I bussed home this afternoon, I paused along the path home to admire the fall colours hanging over a weathered leaning fence. Being without a camera, I impulsively picked a few small branches to scan at home. I haven’t posted any fall colours or done any scanning for a while so that made me feel better!

I also had a wonderful surprise awaiting when I opened my computer. Today Qarrtsiluni posted my ARKEO #4 along with a fabulous podcast by the editors Beth Adams and Dave Bonta. I think they made interesting observations, including the comment about emerging language. It’s always heartwarming to feel that one’s work is meaningful to others. I felt inspired by the current theme, Words of Power, so I’m very honoured to have my work included in qarrtsiluni again. Founding editors Beth and Dave have done such a fantastic job of this amazing online magazine and deserve a round of applause! If you don’t know it, do please check it out.

UPDATE Nov. 6th: I must tell you more about Lucy’s naming! This morning Bonnie, our technician, was showing me the small changes that had been made yesterday to restore Lucy’s operation. As I prepared to print, I told her about how amused some of you readers were concerning the fact that we have a name for this printer. Bonnie said she got the name from her brother’s old grey car. And get this: her brother is very interested in history and old things, so my thoughts of the early hominid Lucy were right on the mark!! Thankfully Lucy the printer is not that old and has lots of life left in her as long as the printer drivers are being updated. She is after all a commercial level printer used in many service bureaus and these folks don’t like to have to change their printers every three years! Oh, and I had great success with my prints today, the colour management is much improved in this version!

Devonian Fossils

HDomkeFossile_Coral_5141.jpg

Imagine having ancient fossils in your own backyard. Henry Domke is the lucky person and has captured their variety and beauty in gorgeous photographs in his Devonian Fossils album. Do have a look, I think you will enjoy them.

The body of water that the fossils are found in is called Hiller’s Creek, in central Missouri, USA. He has kindly allowed me to feature a couple of his photos here. Learn more about this multi-talented man from his websites:
Henry Domke
Health Care Fine Art
Prairie Garden Trust

HDomkeFossilHillersCreek317.jpg

Thank you, Henry, for sharing these amazing images of nature’s art, what riches! A special thanks also to faithful reader Bill Knight for pointing me to Henry Domke’s photos, saying: “They’re Devonian.  The most common fossil is a type of Hexagonia Coral, the same genera that makes up the fossils known as Petoskey stones.” Bill has frequently contributed blog ideas to me over the years, he really should be a blogger too!

Related posts:
Time Traveller
Geologic Journey
Rocks Bearing Fossils
Art in Nature

walk in the park

fall_leavesCates1.jpg

Another glorious fall day today! A walk in the park was absolutely essential. It was amazing how many leaves were covering the paths and they were delightfully dry and rustling underfoot. So often they are soggy and slippery by this time here on the wet coast. I felt like a school child kicking up leaves and remembering Winnipeg autumns.

fall_leavesCates2.jpg

Still feeling small as a child, looking up, up through the leaf canopies of the giant maples…

fall_leavesCates3.jpg

Native vine maples shot with red and yellow, contrasting with the dark green cedars and hemlocks, reminding me of long ago boxes of colourful wax crayons.

UPDATE October 30th: This is my submission for the next Festival of the Trees blog carnival. If you’d like to join the fun, do it right now!

golden

sunoncloset.jpg

sunondesk.jpg

Our October days have been alternating between warm and sunny with crisp nights or cool and rainy. Today was a golden day with a clear blue sky. As I was driving home from the studio, I felt my heart sing as I passed glorious huge maple trees ablaze in all the shades of yellow, gold and amber, contrasting with the ever present evergreens of the West Coast. I was reminded of a recent article about Vancouver’s Midas touch in autumn. How I wished I’d had the camera with me to catch the light glimmering behind those brilliant trees.

A bit of that mood returned late this afternoon when the sun shone into my office and briefly danced its golden light and shadows on the closet wall and on my desk. This time I had the camera handy to catch that ephemeral moment in time.

lovely links

yukon.jpg

The Yukon Delta taken 5/26/2002 by ASTER
Image courtesy of USGS National Center for EROS and NASA Landsat Project Science Office

1. Our Earth as Art – Landsat-7 and ASTER satellite images of the earth that look like fabulous artworks. Thanks to artist Joanne Mattera, do check out her favourites. I’d seen these somewhere before and am so pleased to see these again so that I can save the link here. Inspirations for my own work?

2. This is an amazing must-see short film: Lena Geiseke’s 3D Exploration of Picasso’s Guernica**

3. Mark your calendars! The second annual International Rock-Flipping Day is on September 7th! Read all about it and plan to participate.

** UPDATE March 4th, 2014: Previous link had expired. Replaced with another that I just came across at Open Culture.

on the pier

BurrardDryDockPier.jpg

Being in the area yesterday evening, my husband and I sauntered over to see the 700 foot long Burrard Dry Dock Pier, just east of Lonsdale Quay in North Vancouver.

BurrardDryDockPier2.jpg

According to this History of the Pier,
The newly refurbished Burrard Dry Dock Pier and St. Roch Dock are a tribute to the City’s shipbuilding history. The Burrard Dry Dock Pier and St. Roch Dock, which were built in 1940 for the wartime shipbuilding effort, once extended much further into Burrard Inlet. The piers, which were recently refurbished as part of the City’s Pier Development project, officially opened on April 23, 2005.

CatesTugs.jpg

It’s been sad to see our shipbuilding industry in decline and then to have much of this area handed over to developers of high end condominium towers and a hotel, with some space set aside for a future maritime museum. The pier area is the only completed public space yet, lying in front of the active construction holes and cranes. Very pleasant it is in how it’s been refurbished incorporating the rail tracks of the original drydock and with many metal shipbuilding details. We found it a quiet and relaxing spot for watching the waterfront activity, though quiet on a Sunday except for the sudden actions of the tugboats (photo by him) coming and going as freighters began moving in with the tide just as we were leaving. I don’t know why it’s taken us over three years to go see this even though we are often in this area, maybe because it is so hidden behind the construction site.

We were quite inspired to take many photos in the golden evening light, so look out for more!

a scan test

shell1%40300.jpg
#1. Originally scanned at 300 dpi.

shell2%40600.jpg
#2. Originally scanned at 600 dpi.

My last post on scanning certainly piqued the interest of several readers! I look forward to seeing the results of your play, everyone!

Barrett tried it out with his ‘cheapo’ (his word) scanner and was very disappointed.

I thought I would demonstrate a test I did for myself as much as for Barrett and any readers interested in more on this subject. I did two scans of the same object, enlarged by 200%, varying only the dpi (dots per inch), the first one at 300 dpi and the second one at 600 dpi.

I placed a handy object, a shell about 10 cm or 4 inches in length, on my open scanner and ran the scanner via PhotoShop. Each comes up as a .psd (PhotoShop) file, better than a Tiff for working with initially. The first scan came up at 3.29 MB in size and the second one at 52.6 MB.

For this test, I made no adjustments for colour, levels, contrast or anything else. On each image, I changed the resolution to 72 ppi, and the image width to 500 ppi. The file size on both then became 455K. Then I proceeded to ‘save to the web’ on each, choosing high quality, 79 (I could have gone higher but this is often the range I normally choose). The result?- both around 48K. The images automatically saved as jpegs. Then I uploaded them to the blog, eager to see if there’s any difference. What do you think? Very subtle to my eyes!

So, the point of this very dry demonstration is to show that if your goal is just to put your scanned image on your blog, you do not have to scan at a huge resolution. I find around 300 is very good, and less would work, depending on your scanner quality.

If you plan to print your image, especially very large, then you may wish to use a very high resolution and magnification to get greater detail. For example, one artist friend of mine did a series of scans of leaves at the highest resolution (1200 dpi?) and after much work on the images, printed them something like 90 x 120 cm (3 ft by 4 ft). They were amazing!

For my own digital printmaking on more moderate paper sizes and with a high-end printer, I’m usually satisfied with less resolution, say at 300. Tests and trials are very much a part of the process for me to determine what works best for the image.

I’d love to hear from others who have a lot of scanning experience and have any tips to share, for I’m always learning!

3D scanning techniques

MacLeodLeaves1.jpg

I love how blogging can foster some interesting conversations and connections, and sometimes give food for more blogging material. A few weeks ago, British blogger Barrett Bonden of Works Well expressed interest in the equipment I use in my photography, then mentioned it in his article Beauty’s hardware. Then Barrett emailed me:

I’m really fascinated with your use of a scanner to image 3D objects. My scanner is a cheapo, has no such facility (the hinged lid would have crushed your wonderful onion skins, for instance) and I’ve always wanted something better. I Googled your scanner [Epson Perfection 4990 Photo] and could see it was superior (although the prices range from £125 to £500-plus and I’m rather hoping yours wasn’t at the higher end). There was no indication, though, about how it handles 3D objects. I realise I’m trading on your skills as a professional here but I’d be very grateful if you could explain please.

My reply with some edits: I had the same concerns about crushing objects. In my earlier experiments, I would lay a cloth, black or white or other over the objects, leaving the lid open of course. I’ve even used a shoebox. The most recent experiments like the onion skins were with nothing at all, still with the lid open and I was astounded that I’d get a black background! Now why didn’t I think of that in the first place?!

I spent more money (though got it ‘on sale’) choosing the Epson Perfection 4990 Photo scanner because I needed the higher resolutions for my digital printmaking, and also because this scanner allows transparency and slide scanning, including odd sizes. My husband’s collection of old extra large slides would not fit the slide scanner I used to have (which became obsolete technology, sigh). I haven’t actually tried the slide scanning out much yet – I think that may become a retirement project. Plus my late father-in-law, a professional photographer left thousands of slides… if we have the energy to sort through these one day. We don’t have a working slide projector that fits these, another story of obsolescence!

Barrett’s response: As simple as that! And there I was dreaming up all sorts of technoid-solutions. As a retired journalist I am horribly tempted to outscoop you on this – old, unpleasant habits die hard. I’m joking but you must blog it. Millions will profit and I’ll be able, knowledgeably, to refer in future blogs to the Rathje 3D Scan.

Well (she chuckles), I don’t know about my rights to the technique and millions profiting from it because I think the real pros have been doing this for a long time already. Serious photography is a more recent development and branch in my art practice, previously it was a tool for image capture for my photo-based printmaking such as photo-etching and then archival inkjet printing.

I prefer using the scanner to capture small objects because I think the results are far better than with the camera, at least in my hands, because I can choose very high resolutions (pixels). This allows me to enlarge or magnify the image to a great extent. This can give some wonderful and exciting surprises, such as shown in this my favourite post on scanning.

I thought of linking to some of my other ‘object scans’ but found far too many to choose from! If new readers (like you, Barrett) are so inclined and have a lot of time, check out my images in Photoworks on the side though not all the photos are scans. It’s dawned on me that ‘scanning’ could have been another category here to improve the search!

MacLeodLeaves2.jpg

Regarding the images here… during my recent purging of old magazines, I had found these dried leaves in one of several Finnish magazines passed on to me years ago by a friend’s Finnish mother who passed away a few months ago. That dear association as well as Barrett’s question compelled me to save them digitally. The one up top is scanned with the lid down, the lower one with the lid up. I’ve even ‘blown up’ a section (below) so you can see the incredible detail possible, though much is lost in compressing for the web.

I should add that the quality of the scanning software provided by the scanner may be another important detail to look into when shopping around. As for photo-editing software, as a professional artist I use PhotoShop exclusively, but I would imagine similar things can be achieved with cheaper consumer level software if you are not planning on doing a lot of large printing. As a Mac user, I find Apple’s iPhoto is good at a more basic level. I’ve not done any serious comparisons with other software, so please do your own research if you are shopping around. Best of luck in your search, Barrett, and thanks for the interesting conversation!

MacLeodLeaves2detail.jpg

Addendum: If you are interested, learn more from my scan tests.

a letter from Teju

My friend Teju Cole is the author of Every Day is for the Thief, which began life as a temporary blog, and was published in Nigeria last year. He is at work on another book, a novel about a young emigre psychiatrist in New York. In the meantime, he is also taking photographs, including these, which he sent me recently in this beautiful letter:

Dear Marja-Leena,
I am more conscious in spring that everything has its own life. It is most obvious with plants because that is where the visible drama is. But, because of the activity of form and color going on in them, I also notice what is happening elsewhere. The rain, the setting sun, puddles in the street, even statues: everything seems especially full of presence at this time. I would almost say that the world appears to be thinking, or lost in thought.
love,
Teju

Teju010bw.jpg

Teju042bw.jpg

Teju054bw.jpg

Teju066bw.jpg

Tejuthe-edge-of-heaven-049.jpg

Thank you, Teju, for allowing me to share your letter and your powerful and mysterious photos with my readers here!

This is the perfect opportunity for me to very-belatedly mention that I purchased a copy of Teju’s novel some time ago and truly felt moved and changed by his amazing words and photos, just as much as I loved his writings on his several too-temporary blogs. (Did I ever write to tell you this, Teju?)

Every Day is for the Thief is published by Cassava Republic and is available through Amazon. Here are two great reviews, by Languagehat and by Ethan Zuckerman.