old technology

I have been revisiting some of my husband’s photos taken inside the Sointula Museum. He only had his camera phone so unfortunately they are not very sharp. I’m quite intrigued by a couple of examples of very old technology.
 

Sointula_Switchboard

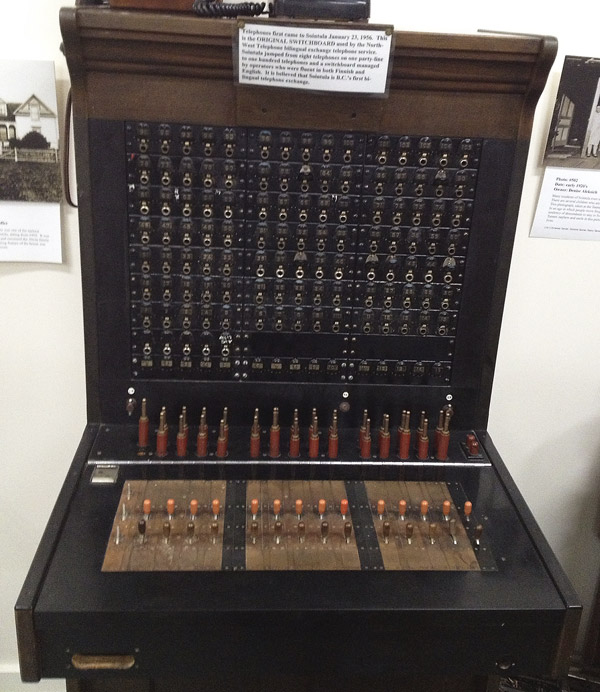
The card on the switchboard says:

Telephones first came to Sointula January 23, 1956. This is the ORIGINAL SWITCHBOARD used by the North-West Telephone bilingual exhange telephone service. Sointula jumped from eight telephones on one party-line to one hundred telphones and a switchboard managed by operators who were fluent in both Finnish and English. It is believed that Sointula is B.C.’s first bilingual telephone exchange.

Below, as labelled, is a Finnish typewriter, patented 1912.

Sointula_FinnTypewriter

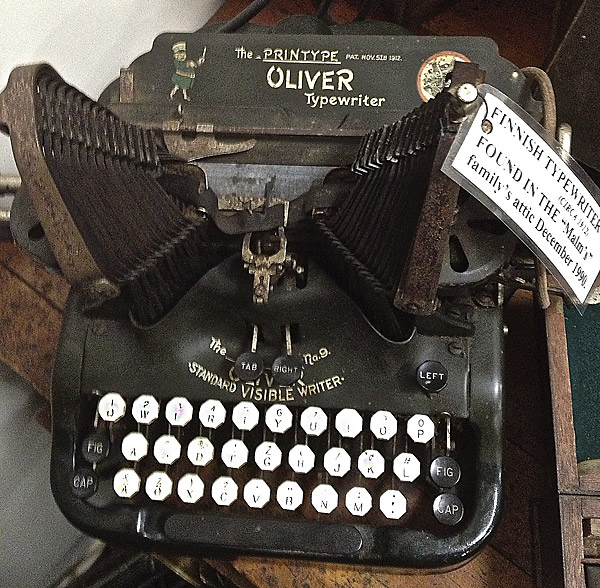
I asked myself, does it have a Finnish keyboard? I blew up the image to try to read the worn out keys. I could tell it’s not our current English keyboard. With the help of a little photoshop sharpening, I think that the two lower left keys are an ä and ö, very important letters in the Finnish language.

100 yr old printshop

EngravingTools.jpg

The printmaker in me was fascinated by an article in our paper about Canada’s first Chinese print shop still in operation here in Vancouver after a century, run by the third generation of the Lam family and the matriarch. The amazing printing presses, the antique stamps, the lead type are all rich in history, function and beauty, so do visit the video at the link. This is far different from current printing technology. All this heritage, including the building is fast disappearing as the family is selling off its contents and closing. Sad.

The image of engraving tools, burins, above is not related to the article, but as I did not have any images of those lovely stamps or types to place here, I thought of these. Not normally used in the type printing such as in this shop, they are the tools of an artist creating engravings on metal plates such as copper. I have had these since art school days, which was not quite as long ago as when this print shop opened up.

scanning fun

foil-scan2.jpg

foil-scan4c.jpg

foil-scan5b.jpg

One day in the kitchen just after the holidays, I had the sudden urge to scan something that was on its way into the garbage. Here are a few of the images I captured. I bet you can guess what these are. They are going into my image library for possible use in future prints.

Longtime readers know how much I love playing with the scanner and have seen the numerous images I’ve posted. There are far too many to dig out from the archives, but here are a few that may be of interest to newer readers, especially those of you who may be interested in some of the techniques I’ve discussed in response to readers’ questions:

scanning
on printers and scanners (scanner and computer updated since)
scanning hands
scannography
scanning techniques
a scan test

a scan test

shell1%40300.jpg
#1. Originally scanned at 300 dpi.

shell2%40600.jpg
#2. Originally scanned at 600 dpi.

My last post on scanning certainly piqued the interest of several readers! I look forward to seeing the results of your play, everyone!

Barrett tried it out with his ‘cheapo’ (his word) scanner and was very disappointed.

I thought I would demonstrate a test I did for myself as much as for Barrett and any readers interested in more on this subject. I did two scans of the same object, enlarged by 200%, varying only the dpi (dots per inch), the first one at 300 dpi and the second one at 600 dpi.

I placed a handy object, a shell about 10 cm or 4 inches in length, on my open scanner and ran the scanner via PhotoShop. Each comes up as a .psd (PhotoShop) file, better than a Tiff for working with initially. The first scan came up at 3.29 MB in size and the second one at 52.6 MB.

For this test, I made no adjustments for colour, levels, contrast or anything else. On each image, I changed the resolution to 72 ppi, and the image width to 500 ppi. The file size on both then became 455K. Then I proceeded to ‘save to the web’ on each, choosing high quality, 79 (I could have gone higher but this is often the range I normally choose). The result?- both around 48K. The images automatically saved as jpegs. Then I uploaded them to the blog, eager to see if there’s any difference. What do you think? Very subtle to my eyes!

So, the point of this very dry demonstration is to show that if your goal is just to put your scanned image on your blog, you do not have to scan at a huge resolution. I find around 300 is very good, and less would work, depending on your scanner quality.

If you plan to print your image, especially very large, then you may wish to use a very high resolution and magnification to get greater detail. For example, one artist friend of mine did a series of scans of leaves at the highest resolution (1200 dpi?) and after much work on the images, printed them something like 90 x 120 cm (3 ft by 4 ft). They were amazing!

For my own digital printmaking on more moderate paper sizes and with a high-end printer, I’m usually satisfied with less resolution, say at 300. Tests and trials are very much a part of the process for me to determine what works best for the image.

I’d love to hear from others who have a lot of scanning experience and have any tips to share, for I’m always learning!

3D scanning techniques

MacLeodLeaves1.jpg

I love how blogging can foster some interesting conversations and connections, and sometimes give food for more blogging material. A few weeks ago, British blogger Barrett Bonden of Works Well expressed interest in the equipment I use in my photography, then mentioned it in his article Beauty’s hardware. Then Barrett emailed me:

I’m really fascinated with your use of a scanner to image 3D objects. My scanner is a cheapo, has no such facility (the hinged lid would have crushed your wonderful onion skins, for instance) and I’ve always wanted something better. I Googled your scanner [Epson Perfection 4990 Photo] and could see it was superior (although the prices range from £125 to £500-plus and I’m rather hoping yours wasn’t at the higher end). There was no indication, though, about how it handles 3D objects. I realise I’m trading on your skills as a professional here but I’d be very grateful if you could explain please.

My reply with some edits: I had the same concerns about crushing objects. In my earlier experiments, I would lay a cloth, black or white or other over the objects, leaving the lid open of course. I’ve even used a shoebox. The most recent experiments like the onion skins were with nothing at all, still with the lid open and I was astounded that I’d get a black background! Now why didn’t I think of that in the first place?!

I spent more money (though got it ‘on sale’) choosing the Epson Perfection 4990 Photo scanner because I needed the higher resolutions for my digital printmaking, and also because this scanner allows transparency and slide scanning, including odd sizes. My husband’s collection of old extra large slides would not fit the slide scanner I used to have (which became obsolete technology, sigh). I haven’t actually tried the slide scanning out much yet – I think that may become a retirement project. Plus my late father-in-law, a professional photographer left thousands of slides… if we have the energy to sort through these one day. We don’t have a working slide projector that fits these, another story of obsolescence!

Barrett’s response: As simple as that! And there I was dreaming up all sorts of technoid-solutions. As a retired journalist I am horribly tempted to outscoop you on this – old, unpleasant habits die hard. I’m joking but you must blog it. Millions will profit and I’ll be able, knowledgeably, to refer in future blogs to the Rathje 3D Scan.

Well (she chuckles), I don’t know about my rights to the technique and millions profiting from it because I think the real pros have been doing this for a long time already. Serious photography is a more recent development and branch in my art practice, previously it was a tool for image capture for my photo-based printmaking such as photo-etching and then archival inkjet printing.

I prefer using the scanner to capture small objects because I think the results are far better than with the camera, at least in my hands, because I can choose very high resolutions (pixels). This allows me to enlarge or magnify the image to a great extent. This can give some wonderful and exciting surprises, such as shown in this my favourite post on scanning.

I thought of linking to some of my other ‘object scans’ but found far too many to choose from! If new readers (like you, Barrett) are so inclined and have a lot of time, check out my images in Photoworks on the side though not all the photos are scans. It’s dawned on me that ‘scanning’ could have been another category here to improve the search!

MacLeodLeaves2.jpg

Regarding the images here… during my recent purging of old magazines, I had found these dried leaves in one of several Finnish magazines passed on to me years ago by a friend’s Finnish mother who passed away a few months ago. That dear association as well as Barrett’s question compelled me to save them digitally. The one up top is scanned with the lid down, the lower one with the lid up. I’ve even ‘blown up’ a section (below) so you can see the incredible detail possible, though much is lost in compressing for the web.

I should add that the quality of the scanning software provided by the scanner may be another important detail to look into when shopping around. As for photo-editing software, as a professional artist I use PhotoShop exclusively, but I would imagine similar things can be achieved with cheaper consumer level software if you are not planning on doing a lot of large printing. As a Mac user, I find Apple’s iPhoto is good at a more basic level. I’ve not done any serious comparisons with other software, so please do your own research if you are shopping around. Best of luck in your search, Barrett, and thanks for the interesting conversation!

MacLeodLeaves2detail.jpg

Addendum: If you are interested, learn more from my scan tests.

printing hands

Last November I wrote about a work in progress, a print combining digital printing and a collagraph. Have a look at that image and compare it to what follows below. My photos are not good but serve to illustrate the process to anyone interested in it.

UntitledTrialProof.jpg

As you can see above, I developed the image further using a collagraph plate of each hand, added a light background texture of grass paper and tweaked some details and colours. I printed this trial proof and planned to edition it soon after.

For various reasons, I did not get back to doing so until last week. It had been such a while since I’d worked on it that I had to do a few tests again. To my dismay, this time the digital print stuck to the inked collagraph plates as they went through the printing press! Tearing paper, tearing my hair, I spent hours testing ink consistencies, wetness or dryness of the paper and the pressure. Nothing worked satisfactorily. Usually if a collagraph has cured a longer time, it’s less likely to stick, so we in the shop could not understand what changed. I even tried a release spray from the sculpture department with no luck.

An etching printed well. So, we determined that it had to be the coating on this digital watercolour paper that does not agree with acrylic medium based collagraphs. Last year I used the same technique on a digital photorag paper with success. What to do next? I had already printed out the digital run of this print and did not want the expense of reprinting on another paper. A deep etched copperplate seemed the only way to match the textural quality I was after, but most of us in the shop don’t like the toxicity of that process anymore.

readytoprint.jpg

With encouragement from Bonnie, our fantastic shop technician, I decided to try inking and printing my own hands! First applying barrier cream on my hands, I pressed them into the ink spread on the glass plate, then test printed first on newsprint.

prints_in_line.jpg

I pressed them directly onto the digital prints spread out on the table, re-inking my hands in between each. Scary yet exciting!

hand_detail.jpg

Look at the details of this cave-woman’s hand!

final_printMLR.jpg

In the end, I think the direct handprints look even better than the collagraph ones.
‘Twas meant to be, for what better way to convey the cave artists’ hands?
Now for a title…

P.S. The paper colour is not quite this dark, more a warm white – poor photos, sorry!

a letter to a friend

daturabud.jpg

Recently Beth wrote about e-mail being the death of letters, resulting in a loss of permanent records for posterity. It came to mind this morning while I was emailing a friend in a more than usual chatty fashion. I started thinking about how it might have turned out if I’d written it by hand. Terrible handwriting and unedited incoherent thoughts for sure (though the latter still happens in emails, heh). Yet the pleasure of opening a real hand written letter is very rare indeed, and I’m guilty. Anyway, I thought I’d share that ‘letter’, slightly edited for privacy and the addition of some links.


Good morning to you, R!

The sun is shining here after days of heavy cold rains. It seemed like November already. And this white stuff you are talking about in Calgary – frost? or snow? Yikes. Whistler has had snow and there are reports that our highest peaks around here would be dusted as well. In the dark last night we started bringing in yet more of my potted plants (yes, I have a LOT) after I read that it’s going to 5C tonight.  Strange how cold the west has been while the east has been very warm, the opposite of normal, though it’s cooling now in the east. I have to get outside today and gather a few more plants. F tells me I have to cut back on having so many plants!

I should be at the studio today, but I got distracted by the weekend trip, and feelings of sadness and pain at seeing the downhill spiral of aging and illness in my favourite uncle and aunt. I’m having trouble focusing on this new work I’m doing – needing to feel and think about what it is I want to do to make this say what I think I want it to say. Before you start worrying about me, let me say that this is normal behaviour for me (and many artists) when starting new work, especially after a break of not working. Yesterday, at the studio, I had a helpful chat with another artist who offered some good suggestions on how to approach this. Now I just need to discipline myself and make time to focus on it. I know it will all fall into place soon. So, I will work on that for a while, then do a few chores.

Late this afternoon is the opening of a friend’s show. F will be cycling as usual and will meet me there after work. The bike stand/carrier is inside the back of the van as well as a change of clothes. When he’s cycled up the big hill to the college, he’ll load his bike in there, change and come find me in the gallery. Afterwards we can drive home together. It’s a pattern we’ve developed whenever we want to meet somewhere after his work.

I’m rambling here… Now to your news.. How wonderful that C has found work! Where and what? I hope it will be a happier experience than the last position – please give her my warmest best wishes!

Thank you, R, for sharing your latest news about your research on your project. Amazing how much you have to deal with people and politics even when writing about a dead person. I suppose that is true more or less in many endeavours. It takes a lot of energy, but you are very skilled at that, R! Good luck, as always. You do sound like you are feeling better.

It’s the Thanksgiving weekend coming up, will you be seeing your family? I think our family will be here on Sunday. Yes, I do hope we’ll have a chance to chat on the phone soon. 
Hugs,
Marja-Leena 

visualizer

visualizer18.jpg

While we were watching Brian Eno’s 77 Million Paintings the other day, the mesmerizing images he’d been able to produce made me think of the wonderful hypnotic dancing colours, lines, dots, shapes that the ‘visualizer’ produces on this screen in response to music played in iTunes on my Mac. it’s fascinating to watch these visual effects in time to the music and I really should be playing it more often.

visualizer19.jpg

I don’t understand the technology behind the visualizer but wonder if it’s similar to what Eno uses.

visualizer21.jpg

Today I was going through some of my photo files and came across a group of photos that my husband had taken a few years ago of some of these images on the screen. These few stills just don’t begin to capture the constantly evolving patterns, but I felt like posting some of them here, just for fun.

visualizer11.jpg

And just because I’d been thinking about the visualizer. And just because I still wish I knew how to create something like this.

tidy up

RathjeHornbyPetroglyph1.jpg

My, have I been busy, either gardening in this gorgeous weather (almost too hot) or indoors tidying up digital files. We are giving away our old Apple G3 computer because we no longer need it, and that’s a bit of a long story.

We’d been using it just to operate our old scanners with their scsi ports. Recently I upgraded to Tiger (on this G5) and discovered that I also had to upgrade Remote Desktop, which allowed me to view the G3 window from this machine. Well, dang it, but this would not work with the particular video card on the G3 – do you think they’d tell you this beforehand? And the G3 crashed! Husband spent hours and days getting it running again. Grrr, this is my pet peeve about the constant and expensive upgrades we are subjected to! And then what to do with the old equipment. We are trying to find homes for them and NOT take things to the dump, but BC is very slow in getting their technical equipment recycling program going! In the meantime, we have a room full of dinosaurs. (The old scanner will work with daughter’s boyfriend’s PC at least!)

Anyway, we ended up buying a new scanner, a lovely beastie indeed. So now, I’m taking off old image and text files from about a dozen Zip disks that I used in those days. Handy, I loved them but they were getting small at 100 MB as my image files became bigger. Then Zip drives became obsolete, replaced by CD and DVD burners. Sigh. Now I have a huge desktop folder here that I must sort through and burn to CDs. What will be next?

But I had to have a bit of fun, too. I’ve been going through some of my photographs (from pre-digital days) especially of some very interestingly weathered rocks and petroglyphs on Hornby Island, one of the northern Gulf Islands here on the west coast of BC. I scanned a few while getting acquainted with this new equipment. One of them is above… your reward, dear readers, for patiently reading through my boring complaints!

By the way, this image was used in several of my prints: Paths XIII (Nexus), Paths X, and Paths XII.

troubles and treats

Saturday morning I had a major shock on opening my blog and finding a commercial page on it and my own contents gone! It’s been hacked and stolen, I think! My email was also down, though the alternates on different servers still worked. My site manager said it seemed my domain had expired, an oversight by the server. It was corrected in a few hours, thankfully, but it was most interesting to note the major dip in my stats, and my own anxiety level which revealed my addictive dependence on my blog! Apologies to readers who might have tried to visit my blog yesterday morning.

Hopefully this event is the last of some technological glitches that have occurred the past few days – things happen in threes, right? On Thursday at the studio, I was preparing to print on the wide-format printer, but there were problems with the newer computer CPU that had been set up to work with the printer. After much time and frustration, the older CPU was put back temporarily while the IT person was going to “fix” the newer one, and I was able to print a couple of proofs.

At home, later that evening, I finally decided to upgrade to Tiger, the latest Mac operating system that has been out for awhile and the rest of the family had already installed months ago on their machines. All seemed well. Friday I decided to do some scanning. As I mentioned before, our scanner is an old model which is connected to an old computer which I access through the network via a piece of software called Apple Remote Desktop. Well, Mac told me it was not installed! Turns out that version is too old for Tiger and I would have to buy a new one – argh! That’s why I hate upgrades!

Anyway, back to Saturday – the rest of the day was blessed. Glorious and much-missed sunshine tempted us out to enjoy spring. The highlights of the day centered around art and a lovely walk around a garden and a lake.

Burnaby Art Gallery is always a favourite place for us because of the lovely old heritage house converted to gallery that features a lot of print shows. This time up we viewed 30 x 30, contemporary small prints from Malaspina Printmakers downstairs, and upstairs were older works from 1977 from Malaspina’s first archives that are in the BAG collection. Interesting to compare the years’ works and an interesting history lesson for me, as a past Malaspina member, is that the workshop originally started right on these grounds at the Burnaby Art Centre (now Shadbolt Centre of the Arts) in 1975.

Afterwards, as always it’s such a pleasant treat to go for a walk on the grounds. We enjoyed the daffodils and spring perennials though it was a little too early for the numerous huge rhododendrons. And there was a very colourful wedding party having photos taken here. My husband managed to capture the scene below before we headed down to the trails by Deer Lake.

atBAG.jpg

Later in the early evening we went to Dundarave Printmakers on Granville Island for the opening of Tomoyo and Taiga’s Made in India exhibition of prints. Beautiful new prints by very prolific artists, mostly etchings by Tomoyo and monotypes by Taiga – do go see these if you’re in the area!